

Description
APM Pixhawk Power Module with BEC 3A XT60 Connector – Product Description

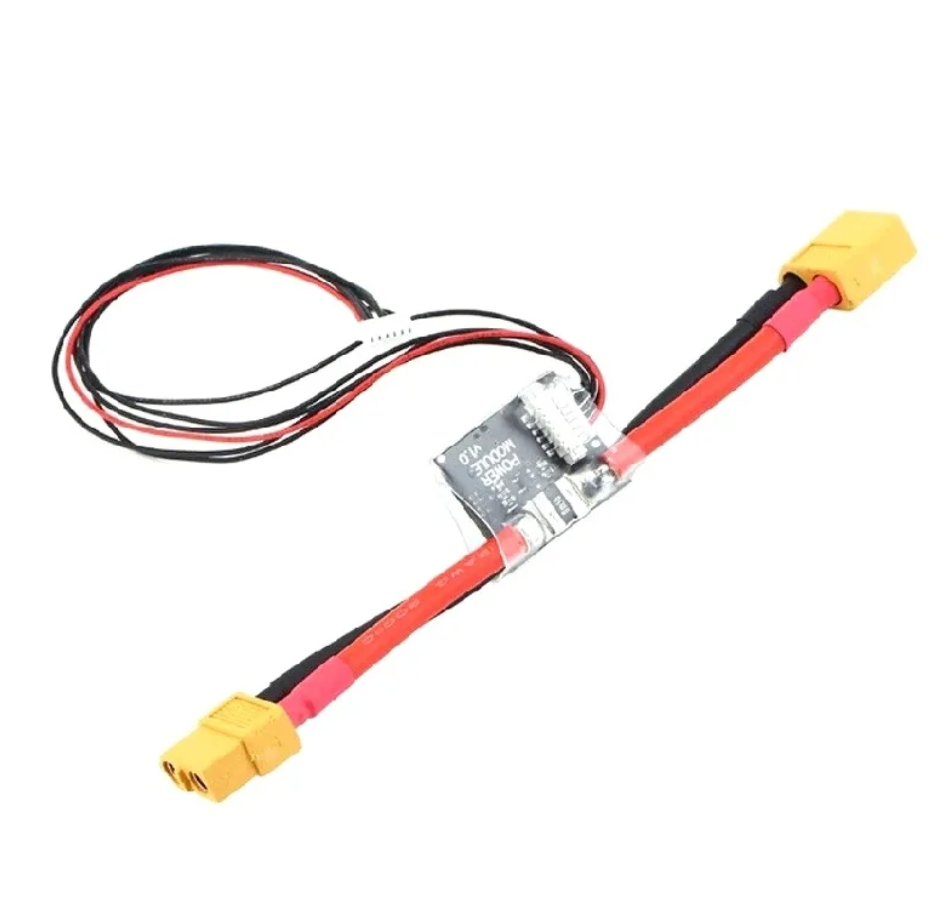
The APM Pixhawk Power Module with BEC 3A XT60 Connector is an essential component for drone enthusiasts and professionals looking for a reliable, compact, and efficient way to monitor their UAV’s power systems. Designed to provide real-time voltage and current sensing capabilities while powering the flight controller through a 3A BEC (Battery Eliminator Circuit), this power module is ideal for a wide range of multirotor and fixed-wing applications.
Key Features of APM Pixhawk Power Module with BEC 3A XT60 Connector
-
Integrated BEC (3A):APM Pixhawk Power Module with BEC 3A XT60 Connector Supplies regulated 5.3V power output to the flight controller ensuring stable operation.
-
XT60 Connectors: APM Pixhawk Power Module with BEC 3A XT60 Connector Pre-soldered XT60 connectors allow for plug-and-play connection with most LiPo batteries.
-
Voltage and Current Sensing: APM Pixhawk Power Module with BEC 3A XT60 Connector Built-in sensors relay real-time data to APM or Pixhawk for accurate monitoring.
-
Compact and Lightweight: APM Pixhawk Power Module with BEC 3A XT60 Connector Ideal for lightweight drone builds, with minimal impact on overall weight.
-
Plug-and-Play Compatibility: APM Pixhawk Power Module with BEC 3A XT60 Connector Seamlessly integrates with APM 2.5/2.6 and Pixhawk flight controllers.
-
Wide Input Range:APM Pixhawk Power Module with BEC 3A XT60 Connector Supports input voltages up to 28V (6S LiPo), and up to 90A current detection.
🛠️ Maintenance of APM Pixhawk Power Module with BEC 3A XT60 Connector
Proper maintenance of the APM Pixhawk Power Module with BEC 3A XT60 Connector is essential to ensure reliable power distribution, stable voltage regulation, and safe operation of your drone or RC system. This maintenance not only prolongs the lifespan of your power module but also ensures consistent flight performance in critical missions.
-
Avoid Moisture Exposure: Keep the module dry to avoid corrosion or short-circuiting.
-
Regularly Inspect Cables: Check for frayed or damaged wires near XT60 connectors.
-
Keep Connectors Clean: Dirt or oxidation on connectors can cause power issues.
-
Monitor Heat: Avoid overloading the system beyond 90A which could heat up the board.
-
Use Heat Shrink or Cases: To ensure electrical insulation and physical protection.
1. Routine Inspection
-
Visual Check: APM Pixhawk Power Module with BEC 3A XT60 Connector Inspect the power module before and after each flight. Look for burnt marks, wire fraying, loose connectors, or swelling in the BEC component.
-
Connector Integrity: APM Pixhawk Power Module with BEC 3A XT60 Connector Ensure the XT60 connectors are tightly secured and free from dirt, oxidation, or corrosion.
-
Wire Check: APM Pixhawk Power Module with BEC 3A XT60 Connector Examine the wiring for any signs of wear, bend stress, or insulation damage.
2. Connector Maintenance
-
Clean the XT60 Connectors using a dry, lint-free cloth. For stubborn dirt or oxidation, use isopropyl alcohol and a soft brush.
-
Avoid Overheating: Repeated disconnection under load can degrade the XT60 connector. Always disconnect the battery after powering off the flight controller.
-
Connector Tightness: If the connectors feel loose, consider replacing the XT60s to prevent mid-flight disconnection.
3. Voltage Calibration Checks
-
Use Mission Planner (or QGroundControl) to verify that the APM Pixhawk Power Module with BEC 3A XT60 Connector is reporting accurate voltage and current values.
-
Perform a calibration every few months or after firmware updates.
-
Cross-check with a multimeter to ensure sensor accuracy.
4. BEC Health Monitoring
-
The BEC (Battery Eliminator Circuit) in this module provides a regulated 5.3V output at 3A.
-
Monitor the temperature of the BEC unit during and after flight.
-
If the unit heats up excessively or shows voltage drops under load, it may be a sign of internal degradation.
-
Avoid powering high-current peripherals solely from the BEC output to prevent overload.
5. Firmware Compatibility
-
Ensure your APM Pixhawk Power Module with BEC 3A XT60 Connector is compatible with the power module’s telemetry output.
-
Regularly update your controller software to prevent bugs or telemetry issues that can misreport voltage or current data.
6. Safe Handling and Storage
-
Disconnect after Use: Always unplug the battery when the drone is not in use to avoid unnecessary current draw or accidents.
-
Dry Storage: Store the APM Pixhawk Power Module with BEC 3A XT60 Connector in a dry, dust-free, anti-static environment when not mounted on a drone.
-
Avoid exposure to moisture, which can lead to corrosion of PCB traces and connectors.
7. Avoid Overcurrent Loads
-
Never exceed the module’s maximum current rating of 90A.
-
Use proper current profiling based on your drone’s motor and ESC requirements to ensure the module is not overloaded.
8. Thermal Management
-
APM Pixhawk Power Module with BEC 3A XT60 Connector Ensure proper ventilation inside your drone’s frame to allow passive cooling of the power module.
-
APM Pixhawk Power Module with BEC 3A XT60 Connector Avoid wrapping the module in foam or sealing it inside airtight compartments without airflow.
9. Firmware & Logs Review
-
APM Pixhawk Power Module with BEC 3A XT60 Connector Check flight logs regularly to monitor any sudden voltage drops, overcurrent warnings, or temperature spikes.
-
APM Pixhawk Power Module with BEC 3A XT60 Connector Logs can help detect early signs of degradation in the power module’s performance.
10. Replacement Schedule
-
Although durable, the APM Pixhawk Power Module with BEC 3A XT60 Connector should be replaced every 12-18 months with frequent use, or sooner if signs of wear are detected.
-
Never reuse an old power module in new builds without proper stress testing.
🚀 Applications of APM Pixhawk Power Module with BEC 3A XT60 Connector
APM Pixhawk Power Module with BEC 3A XT60 Connector power module is an essential component for modern UAV and robotics projects. Its wide voltage support (up to 28V) and 90A current sensing capability allow it to power both hobby and industrial drones effectively.
1. Multirotor Drones (Quadcopters, Hexacopters, Octocopters)
-
APM Pixhawk Power Module with BEC 3A XT60 Connector Powers flight controller while monitoring voltage and current draw.
-
APM Pixhawk Power Module with BEC 3A XT60 Connector Useful in both small and large-scale aerial photography drones.
2. Fixed-Wing Drones
-
APM Pixhawk Power Module with BEC 3A XT60 Connector Offers reliable voltage feedback to the autopilot, helping fixed-wing drones fly efficiently for longer durations.
3. Autonomous Delivery Drones
-
APM Pixhawk Power Module with BEC 3A XT60 Connector Ensures safety and efficiency by offering real-time telemetry data on battery status during transit.
4. Agricultural Drones
-
APM Pixhawk Power Module with BEC 3A XT60 Connector Supports heavy-lift drones with precise current monitoring when spraying pesticides or fertilizers.
5. Robotics Projects
-
APM Pixhawk Power Module with BEC 3A XT60 Connector Suitable for mobile robotic platforms that require voltage regulation and current feedback for motor control.
6. FPV (First Person View) Drones
-
APM Pixhawk Power Module with BEC 3A XT60 Connector Powers onboard camera and transmitter systems with a stable 5.3V BEC.
7. Search & Rescue UAVs
-
APM Pixhawk Power Module with BEC 3A XT60 Connector Monitors battery usage in real-time to ensure maximum safety and reliability during critical missions.
8. Educational & DIY Projects
-
APM Pixhawk Power Module with BEC 3A XT60 Connector Easy to integrate into Arduino or Raspberry Pi-based autonomous vehicle builds or research-grade drones.
✅ Advantages of APM Pixhawk Power Module with BEC 3A XT60 Connector
This module is specifically designed to meet the high demands of modern drone operations.
1. Reliable Power Supply
-
APM Pixhawk Power Module with BEC 3A XT60 Connector Integrated 5.3V 3A BEC provides consistent power to the flight controller without voltage fluctuations.
-
APM Pixhawk Power Module with BEC 3A XT60 Connector Prevents brown-outs during critical flight stages.
2. Real-Time Telemetry Support
-
APM Pixhawk Power Module with BEC 3A XT60 Connector Monitors voltage and current usage accurately and sends data to autopilot systems for analysis and safe flight.
-
APM Pixhawk Power Module with BEC 3A XT60 Connector Helps in estimating flight time and battery health.
3. High Current Handling (Up to 90A)
-
APM Pixhawk Power Module with BEC 3A XT60 Connector Suitable for powerful drones with heavy motors and payloads.
-
APM Pixhawk Power Module with BEC 3A XT60 Connector Ensures there is no overheating or failure due to high amp draw.
4. Compact & Lightweight
-
Easy to integrate into tight airframes and compact drone builds.
-
Doesn’t add unnecessary weight, improving flight efficiency.
5. Plug & Play XT60 Connector
-
Universal XT60 connector allows quick connection and disconnection.
-
Makes field replacements easy without soldering.
6. Wide Voltage Support (Up to 28V)
-
Compatible with 2S to 6S LiPo batteries.
-
Offers flexibility in choosing the right battery for different applications.
7. Pixhawk & APM Compatibility
-
Works seamlessly with both APM and Pixhawk flight controllers.
-
No need for manual tweaking or custom firmware.
8. Made for Safety-Critical Missions
-
-
Built-in current and voltage sensing enhances redundancy and flight planning.
-
Crucial for commercial and industrial applications like mapping and surveying.
-
🔧 Installation Guide for APM Pixhawk Power Module with BEC 3A XT60 Connector
-
Connect Battery:APM Pixhawk Power Module with BEC 3A XT60 Connector Plug your LiPo battery into the XT60 male input connector.
-
Power Distribution: APM Pixhawk Power Module with BEC 3A XT60 Connector Connect the XT60 female connector to your ESC power distribution board.
-
Sensor Output: APM Pixhawk Power Module with BEC 3A XT60 Connector Plug the 6-pin cable from the power module to the ‘Power’ port on your APM or Pixhawk flight controller.
-
Secure the Module: APM Pixhawk Power Module with BEC 3A XT60 Connector Mount the power module using zip ties or double-sided tape to avoid vibration or wire strain.
-
Configure via Mission Planner: APM Pixhawk Power Module with BEC 3A XT60 Connector Calibrate voltage and current sensors in Mission Planner or QGroundControl to ensure accurate readings.
-
Check Readings: APM Pixhawk Power Module with BEC 3A XT60 Connector Ensure current and voltage are correctly displayed on your GCS (Ground Control Station) before flight.
📦 What You’ll Need:
-
APM Pixhawk Power Module with BEC 3A XT60 Connector
-
APM or Pixhawk flight controller
-
Drone power system (battery and ESCs)
-
Soldering tools (if required for custom wiring)
-
Double-sided tape or mounting pads
-
Zip ties or heat shrink tubing for securing wires
🛠️ Step-by-Step Installation Instructions
Step 1: Safety First
-
Make sure your drone is powered off.
-
Disconnect all power sources before installation to avoid short circuits.
-
Work on a static-free surface and use an anti-static wrist strap if possible.
Step 2: Identify Connectors
-
XT60 Input Connector: Connects to your LiPo battery.
-
XT60 Output Connector: Goes to your ESC power distribution board.
-
6-pin JST Connector (with wires): Connects to your Pixhawk/APM power port.
-
BEC Output: Supplies 5.3V, 3A regulated voltage to your flight controller.
Step 3: Connect the Battery
-
Plug your drone’s LiPo battery into the XT60 female connector of the power module.
-
Ensure that the polarity is correct: Yellow = Positive, Black = Negative.
-
Secure the connection with a heat shrink tube or zip tie to avoid loose contact.
Step 4: Connect to ESC/Power Distribution Board
-
Plug the XT60 male connector of the power module into the ESC or PDB (Power Distribution Board).
-
This will allow current to flow to all motors through the ESCs.
-
Make sure this connection is tight and secure, as this handles high current.
Step 5: Connect to Pixhawk/APM Flight Controller
-
Insert the 6-pin JST cable into the POWER port on the Pixhawk/APM.
-
This connection provides:
-
Regulated power (5.3V) to the flight controller
-
Battery voltage and current telemetry to monitor in-flight performance
-
-
Be careful to insert the connector in the correct orientation (refer to your flight controller manual).
Step 6: Mount the Power Module
-
Use double-sided foam tape or a mounting pad to fix the power module inside the drone frame.
-
Position it near the battery tray for shorter wire length and minimal resistance.
-
Avoid placing the module too close to heat sources or moving parts.
Step 7: Secure the Wiring
-
Use zip ties or Velcro straps to neatly bundle and secure the wires.
-
Ensure that no wires are touching propellers or motor shafts.
-
Leave enough slack for battery swapping but avoid excessive loose wiring.
Step 8: Final Check Before Powering Up
-
Verify all connections again:
-
Battery to Power Module
-
Power Module to ESC/PDB
-
Power Module to Pixhawk/APM
-
-
Check for any exposed wires or shorts.
-
Use a multimeter to confirm polarity if needed.
Step 9: Power On and Test
-
Plug in the battery and observe LED indicators on the Pixhawk/APM.
-
Check that:
-
The flight controller powers on.
-
Telemetry data for voltage and current appears in Mission Planner or QGroundControl.
-
There are no error messages related to power supply.
-
Step 10: Calibrate Voltage and Current Sensing (Optional)
-
Launch Mission Planner (for APM) or QGroundControl (for Pixhawk).
-
Navigate to Initial Setup > Power Module.
-
Select the correct power module type.
-
Calibrate voltage and current readings using a digital multimeter for accuracy.
✅ Tips for Optimal Installation
-
Keep the power module away from high EMI sources like ESCs or video transmitters.
-
Do not exceed the recommended voltage (28V) or current (90A) limits.
-
Avoid using damaged connectors or bent pins.
-
Always use genuine or high-quality XT60 conne
Maintenance Tips for Longevity
-
Avoid Moisture Exposure: Keep the module dry to avoid corrosion or short-circuiting.
-
Regularly Inspect Cables: Check for frayed or damaged wires near XT60 connectors.
-
Keep Connectors Clean: Dirt or oxidation on connectors can cause power issues.
-
Monitor Heat: Avoid overloading the system beyond 90A which could heat up the board.
-
Use Heat Shrink or Cases: To ensure electrical insulation and physical protection.
Why Choose APM Pixhawk Power Module with BEC 3A XT60 Connector?
-
-
Offers both power regulation and real-time telemetry in one compact device.
-
Designed specifically for drone systems using APM and Pixhawk.
-
Reduces the need for multiple components (like external BECs and sensors).
-
Ideal for both DIY hobbyists and professional UAV operators.
-
Simplifies cable management and enhances overall drone reliability.
-
✅ Summary: Why ABS Plastic Landing Gear for Quadcopter is the Best Choice
| Feature | Advantage |
|---|---|
| Shock Absorption | Reduces damage from hard landings |
| Ground Clearance | Protects sensitive parts like cameras |
| Stability | Prevents tipping on uneven surfaces |
| Lightweight ABS Material | Adds minimal weight, increases durability |
| Easy Installation | DIY-friendly and universally compatible |
| Maintenance-Free | No rust or corrosion issues |
🏁 Final Thought
Choosing the ABS Plastic Landing Gear for Quadcopter isn’t just about adding an accessory — it’s about protecting your investment, improving your drone’s functionality, and ensuring safe, stable flights every time. Whether you’re a beginner or a professional aerial surveyor, adding a quality landing gear set will extend the life of your drone and improve your flight experience significantly.
🌟 Why Choose Lofty Agrotech?
When you choose our ABS Plastic Landing Gear for Quadcopter, you’re not only investing in a high-quality accessory—you’re partnering with Lofty Agrotech, a trusted brand at the forefront of drone innovation and agritech solutions.
🇮🇳 1. Proudly Made in India
Every set of our ABS Plastic Landing Gear for Quadcopter is manufactured right here in India, supporting local industry and reducing shipping times and costs. With on-site quality control, we deliver premium products that meet rigorous standards.
🛠 2. Expertly Engineered for Performance
-
Crafted with precision-designed ABS plastic, offering exceptional strength and durability.
-
Built to withstand impact, weather, and rough landings—so your drone stays protected during critical operations.
⚙️ 3. Rigorous Quality-Control & Testing
-
Each piece undergoes stress testing to ensure long-term reliability.
-
We perform checks on mounting stability, material resilience, and dimensional accuracy to guarantee consistent performance.
🤝 4. Deep Domain Knowledge
Backed by expertise in agricultural drones, surveying UAVs, and professional aerial systems, Lofty Agrotech understands the operational demands you face—and designs components like landing gear accordingly.
🌱 5. Complete Agro-Drone Ecosystem
From unmanned sprayers and sensors to drone frames and landing gear, we provide end-to-end solutions for drone-based agriculture and surveying. Our broad portfolio ensures compatibility, seamless performance, and exceptional value.
✨ 6. Fast Shipping + Dedicated Support
Need help with installation or compatibility? Our Coimbatore-based support team offers quick, knowledgeable guidance. With ready stock and reliable logistics, deliveries reach you faster than most competitors.
💰 7. Excellent Value for Money
Our ABS Plastic Landing Gear for Quadcopter combines premium design with affordable pricing—delivering performance that rivals imported alternatives at a fraction of the price.
🌍 8. Community & Sustainability Focus
Beyond products, Lofty Agrotech empowers farmers through rental platforms and direct market access. Choosing us means supporting sustainable, impactful agro-tech initiatives across rural and semi-urban India.
✅ In Summary
| Benefit | Impact |
|---|---|
| Indian-Made | Supports local manufacturing, faster delivery |
| Engineered to Last | Survives tough conditions with reliable performance |
| Thorough QC | Durable parts you can trust |
| Domain Expertise | Designed for real drone use-cases |
| Ecosystem Fit | Works seamlessly with other Lofty Agrotech gear |
| Great Support | Quick technical assistance when you need it |
| Cost-Effective | Competitively priced with high quality |
| Social Impact | Backing sustainable farming and rural growth |
LOOKING FOR MORE? DISCOVER EVERYTHING WITH OFFER AT http://www.loftyagrotech.com


Reviews
There are no reviews yet.